
If you come from a coding background, your life could get a little easier if you know how to manage environment variables in React Native app. The most fantastic part about this is that it does not vary the way your app looks, smells or feels.
But, on the contrary, it exponentially saves hassle, time and efforts that mobile app developers in Dubai may encounter. This blog post is a complete guide to understand “How to manage multiple environments in React Native app for Android”.
Remember, if the React Native app environment variables are specifically defined, they offer an easy approach for:
- Change the launch screen of the app
- Alter the icon for any variant developed
- Change app’s display title or name
- Alter the bundle/app IDs to facilitate installation of any available environment variant on same device simultaneously
- Easily change variable value at the development time
To understand it better, I will share an instance with you, as it will become easier for you to understand.
There are times when we feel the urge to set up multiple environment variables in React Native for development, staging and final launch. Although, building different environments is relatively easy. It’s the management part that’s difficult. In this article, I will explain how we can easily manage multiple environments in simple steps.
ALSO READ : TOP FRAMEWORKS FOR APP DEVELOPMENT COMPANIES IN DUBAI FOR 2021
Usually there is one environment when the project is in the development phase, but as the project grows and it’s testing starts and if you plan to roll out the app, you need more environment with distinctive URLs, API tokens, and many other configurations.
A handful of these environment are as follows:
- Development – This phase is generally used for developing new feature sets. Besides, the app developers in dubai use dummy data for validating the functionality and the flow of the app and that’s where the development environment comes to the rescue.
- Quality Analysis – Considering this aspect, its core function is to tests the functionality. This environment is also the point where sharing of the code is done since it’s almost the same as production partners with a feel of production data getting tested.
- Production – This environment is where we roll out the app to the end-users.
To have a quick insight of how to set up different environment in the app, let’s create an envs folder in the root of the app and make a JSON file of each of your environment like:
- envs/development.json
- envs/staging.json or envs/qa.json
- envs/production.json
The Instance For Easy Understanding
Imagine you have two apps. One of the apps is used by the sales team, and the marketing team uses the other. And, you observed that approximately 90% of the app features, interface and user experience is the same. Therefore, it’s suggested that instead of using two distinctive mobile apps with subtle differences, why should not one use React Native development approach to save the development effort and time while making the maintenance and alterations of the code more manageable in future.
The Comprehensive Guide To Setup Multiple Environment In A React Native App For Android
#Step 1: Using React Native CLI For React Apps
First and foremost, go to “My Apps” and choose React Native.
Now run your android application by selecting the ‘Run Android’ option under React Native.

Once you are done installing it successfully, your directory structure will be ready to use and appear somehow like this.

#Step 2: Arranging Multiple Environment Using Product Flavors In Android
As you are done installing the directory structure, now you have to choose the desired environment variables for Android apps by using product flavours.
Start like:
Go to android/app/build.gradle and add dot env gradle path on the 2nd line, like shown below:

Now add env configuration for your needed environment. Besides, remember to use, “default” as the flavor dimensions.
At the Android end, the most unskippable thing is to develop the product flavors. To achieve this, go to android/app/build.gradle and add the following syntax.
Now create a launch screen and icons for product flavors. While doing so, keep in mind that the ‘res folder is located inside the src/main folder by default, as shown below.
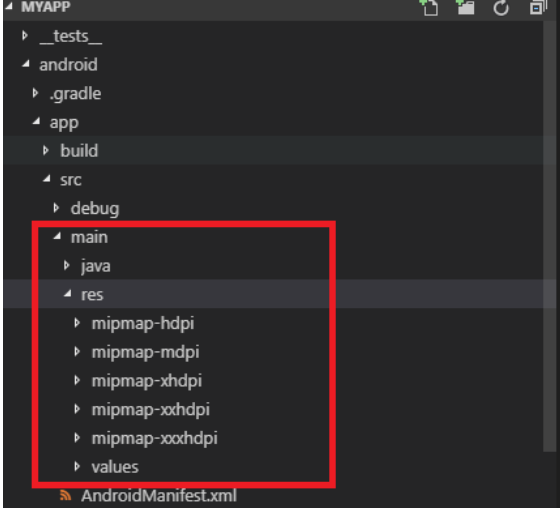
Although, if you want to have different splash screens and icons for the flavours, then you should create an individual folder of each flavour in src. Moreover, don’t forget to keep the folder name the same as the product’s flavour name as already defined earlier in the build.gradle.
You will have different folders – i.e. one “main” and other “product flavors”. Your defined product flavors will have splash screens, apps and icons values, and in case something doesn’t exist within the flavor directory, then the resources of the main directory can be used.
#Step 3: Use React Native Configuration Package
Use React Native configuration package for using the environment variables.
Then, after the installation of the package is completed, build two env files that are the root of your project. By using this configuration model, you can easily access the environment.

#Step 4: Creating Your App
To run on Android app development – include these in packages.json inside the ‘scripts’ tag to run your app on the simulator.

To develop an unsigned built or APK – Add the following scripts inside your package.json

ALSO READ : Top 10 Mobile App Development Companies in Dubai Saudi Arabia 2021
The Conclusion:
This is an easy and consistent way to manage the configuration needs in your app for android. Including setting it up to and adjusting the workflow, everything is accessible and achievable.
If still you are curious to know how I manage other elements when developing React native apps, check out the strategies penned for the pioneer’s mobile app developers in Dubai.
In this article I’ll explain a bit more about how to setup different environments in React Native and how to properly manage them across Javascript and native code.
To fully understand it you need to have knowledge in Javascript, React Native and understand a bit about React Native’s project native structure (iOS and Android). So… let’s start.
Motivation
That article is like a puzzle I grouped all the important and valuable information that I’ve found during the implementation of environment setup in a project. Most of the articles or tutorials that I could find about the theme did not approach both, Javascript and Native code. So, I decided to do it.
I will be happy if it helps you in any aspect 😄.
Understanding the problem
In a real project, we usually have three main environments (Development, Staging and Release). Those have each a different environment setup, like different API urls or Firebase projects.
But, how can we properly set up these variables according to the type of App that we want to run?
Since we usually have a lot of configurations that depend on which environment we are running, all of you agree that changing them by hand is not a good idea, right? In that case, we need to write some scripts to automate it, in both JS and Native sides. And that is exactly what we are going to see during this article.
Setting Up Javascript Environment
Now that we know the problem, we can start to solve it. First, we need to setup different environments for the Javascript side of our project. That step is a bit easier and straight forward, since we just need to create some files and write a script to replace them before running the application.
First of all, we need to create the folders and files structure. In our project src path, create a config folder with another folder called env inside it. For each of the environment types that we have in our application we need to create a folder under the env directory.
